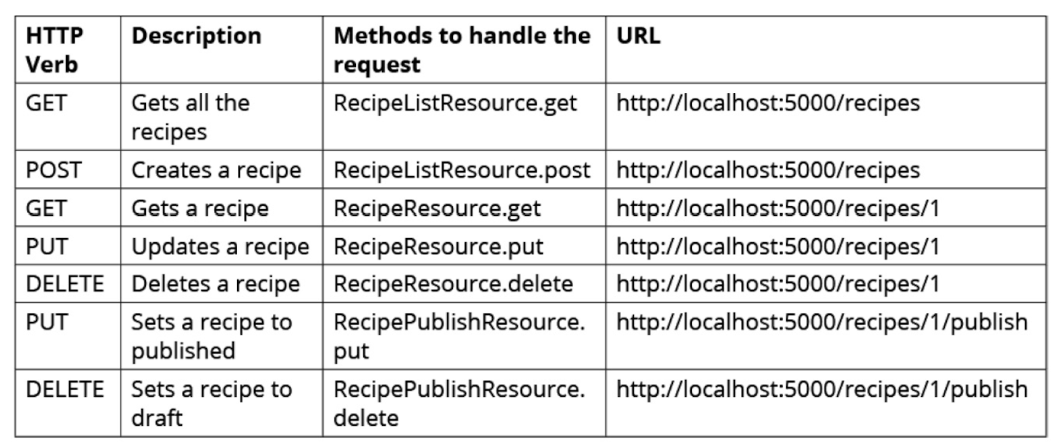
DB에서 테이블을 만든다.
레시피 테이블 생성:
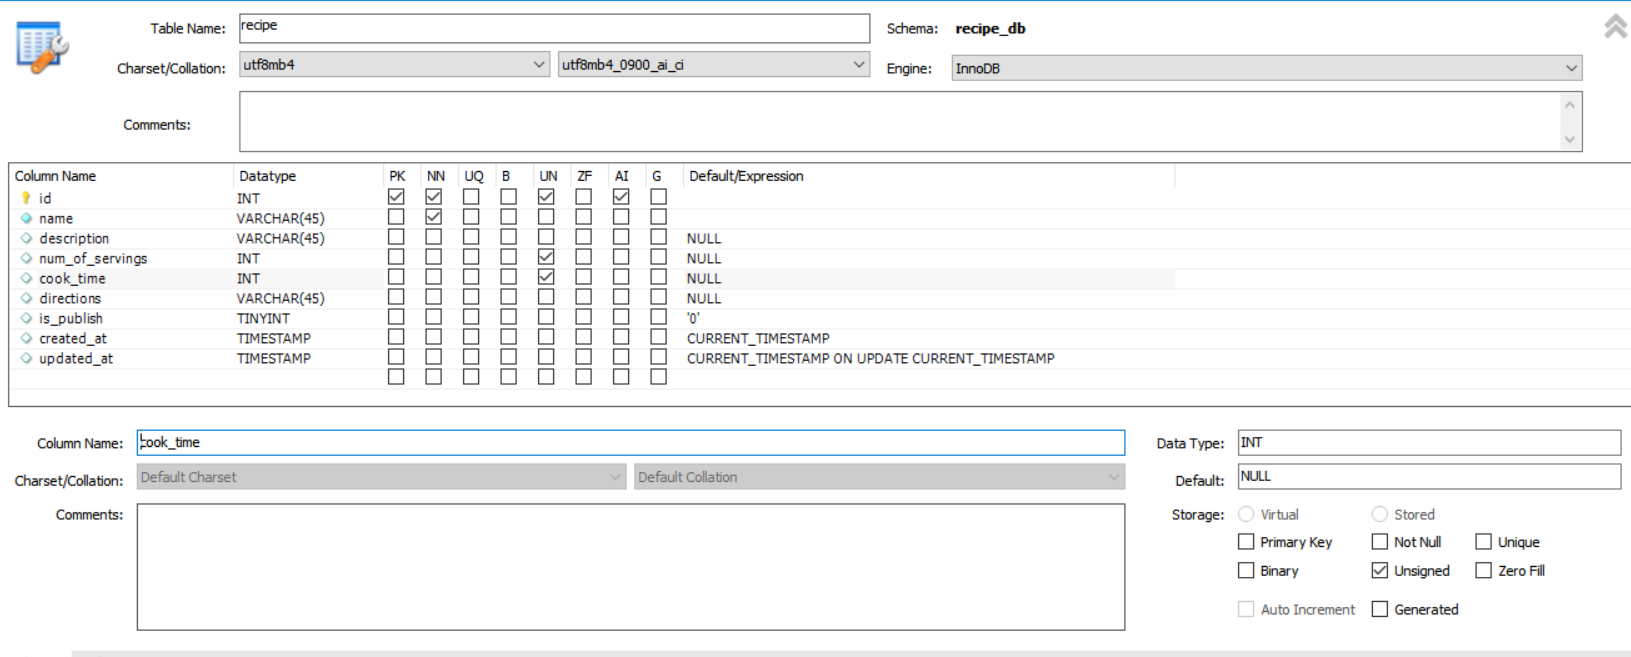
유저 테이블 생성:
그 후 계정 만드는 코드를 차례로 입력한다.
use mysql;

create user 'recipe_user'@'%' identified by  'recipe1234';

grant all on recipe_db.* to 'recipe_user'@'%';
# 유저 이름과 사용할 비밀번호를 설정한 후 다음 코드에서 해당 유저에게 해당 DB의 모든 권한을 부여한다.
작업환경인 비쥬얼 스튜디오 코드(이하 코드)에서 DB와 연결하기 위해 mysql-connector-python를 설치한다.
설치코드:
pip install mysql-connector-python
연결을 위한 파이썬 파일을 생성 후 get_connection 함수를 작성한다.
import mysql.connector
def get_connection():
    connection = mysql.connector.connect(
        host = 'yh-db.~~~.ap-northeast-2.rds.amazonaws.com',  # sql 호스트네임 작성
        database = 'recipe_db',
        user = 'recipe_user',
        password = 'recipe1234'
    )
    return connection
# 파일명은 알아보기 쉽게 mysql_connection.py으로 작성했다.
# host에 sql 호스트네임을 입력했다.
# database, user, password에 위의 SQL문에서 설정해준 데이터베이스, 유저이름, 비밀번호를 입력한다.
이제 레시피를 작성하는 API를 만든다.
먼저 포스트맨에서 add request를 한 뒤. 클라이언트에 넣어줄 데이터를 입력한다.

# JSON은 큰따옴표를 사용해야 한다는것에 유의하자.
SQL에서 넣어줄 쿼리문을 테스트한다.
insert into recipe
(name, description, cook_time, directions)
values
('김치찌개', '맛있는 김치찌개 만드는 법', 30 , '먼저 고기를 볶은후, 물을 넣고, 김치넣고 끓인다.');
# 김치찌개 레시피가 잘 작성된것을 확인했다.
# 확인 했으면 다시 이 레시피를 delete로 지운다.
그 후 코드에서 resource를 넣을 파일을 따로 생성하고 해당 클래스에 post메소드를 이용하여 API를 작성한다.
from http import HTTPStatus
from flask import request
from flask_restful import Resource
from mysql.connector.errors import Error
from mysql_connection import get_connection
import mysql.connector

class RecipeListResource(Resource):

    def post(self):

        # 클라이언트에서 body부분에 작성한 json을 받아오는 코드
        data = request.get_json()

        try:   # 정상적일때
            # 1. DB에 연결
            connection = get_connection()

            # 2. 쿼리문 만들기
            query = '''insert into recipe
                    (name, description, cook_time, directions)
                    values
                    (%s ,%s ,%s ,%s);'''

            record = (data['name'], data['description'], data['cook_time'], data['directions'] )

        	# 3. 커서를 가져온다.
            cursor = connection.cursor()

            # 4. 쿼리문을 커서를 이용해서 실행한다.
            cursor.execute(query, record )

            # 5. 커넥션을 커밋해줘야 한다 => 디비에 영구적으로 반영하라는 뜻
            connection.commit()

            # 6. 자원 해제
            cursor.close()
            connection.close()

        except mysql.connector.Error as e :
            print(e)
            cursor.close()
            connection.close()
            return {"error":str(e)}, 503   # 혹은 HTTPStatus사용

    	return {"result":"success"}, 200
# 쿼리문에서 '%s'를 사용하여 넣어줄 데이터를 따로 받아서 사용할수있게 한다.
# 튜플형태의 record에서는 클라이언트에서 get_json으로 받은 딕셔너리 형태의 데이터들을 분리하여 넣어준다.
# post, put, delete와 같은 DB에 직접적으로 영향을 주는 메소드에서는 commit을 꼭 사용해야 한다.
# HTTPStatus 관련링크 https://developer.mozilla.org/ko/docs/Web/HTTP/Status
작성한 클래스를 app.py파일에 연결시킨다.
from flask import Flask, jsonify, request
from http import HTTPStatus
from flask_restful import Api
from resources.recipe import RecipeListResources

app = Flask(__name__)

api = Api(app)

# 경로와 resource(API 코드)를 연결한다.
api.add_resource(RecipeListResources, '/recipes')

if __name__ == '__main__' :
    app.run()
포스트맨으로 send를 눌러 테스트한다.
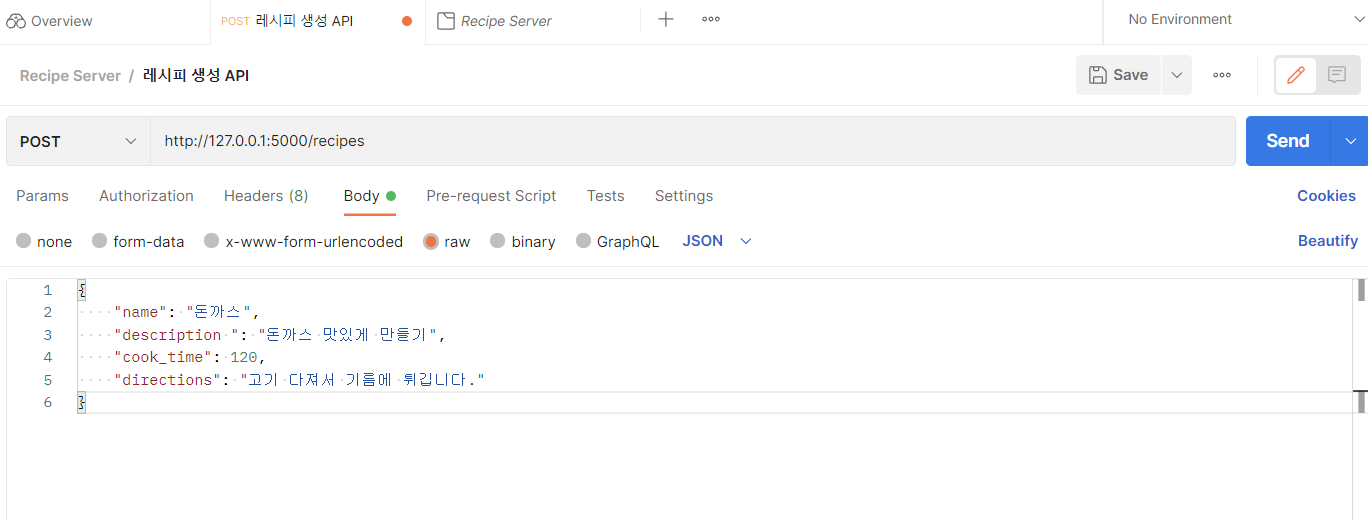

# send를 누르면 포스트맨에서 입력한 데이터를 클라이언트로 보낸다.
# 클라이언트는 다시 데이터를 post 메소드가 있는 클래스로 보내어 실행시킨다.
# 연결된 DB로 데이터가 저장된다.
이제 get 메소드를 사용해서 레시피 가져오는 API 를 만든다.
get 메소드를 사용하여 페이지를 구분하여 보여줄때는 포스트맨의 body에서 데이터를 입력하지않고 파라미터에 offset과 index를 지정한다.

select문을 사용하여 get메소드를 작성한다.
def get(self) :
        # 쿼리 스트링으로 오는 데이터는 아래처럼 처리한다.
        offset = request.args.get('offset')
        limit = request.args.get('limit')

        #DB로부터 데이터를 받아서 클라이언트에 보낸다.

        try :
            connection = get_connection()

            query = '''select *
                    from recipe
                    limit '''+offset+''','''+limit+''';'''

            # select 문은 dictionary = True를 해준다.
            cursor = connection.cursor(dictionary = True)  # 데이터를 셀렉할때 키벨류로 가져온다.

            cursor.execute(query )

            # select문은 아래 함수를 이용해서 데이터를 가져온다.
            result_list = cursor.fetchall()

            print(result_list)

            # 중요! DB 에서 가져온 timestamp는 파이썬의 datetime으로 자동 변경된다.
            # 문제는 이 데이터를 json.으로 바로 보낼수 없으므로 문자열로 바꿔서 다시 저장해서 보낸다.

            i = 0
            for record in result_list:
                result_list[i]['created_at'] = record['created_at'].isoformat()
                result_list[i]['updated_at'] = record['updated_at'].isoformat()
                i = i + 1

            cursor.close()
            connection.close()

        except mysql.connector.Error as e :
            print(e)
            cursor.close()
            connection.close()
            return {"error":str(e)}, 503

        return { "result" : "success",
                "count" : len(result_list),
                "result_list" : result_list} , 200
# get 메소드를 작성할때는 commit을 사용하지 않는다.
# select문에서는 connection.cursor에서 dictionary파라미터를 True로 설정하여 키벨류로 가져올수있도록 한다.
# select문에서는 fetchall을 사용하여 받은 데이터를 변수로 저장한다.
# DB에서 데이터를 받을때 날짜 데이터는 json으로 바로 보낼수 없으니 변환하는 과정을 추가한다.
포스트맨을 통해 데이터를 받았다.
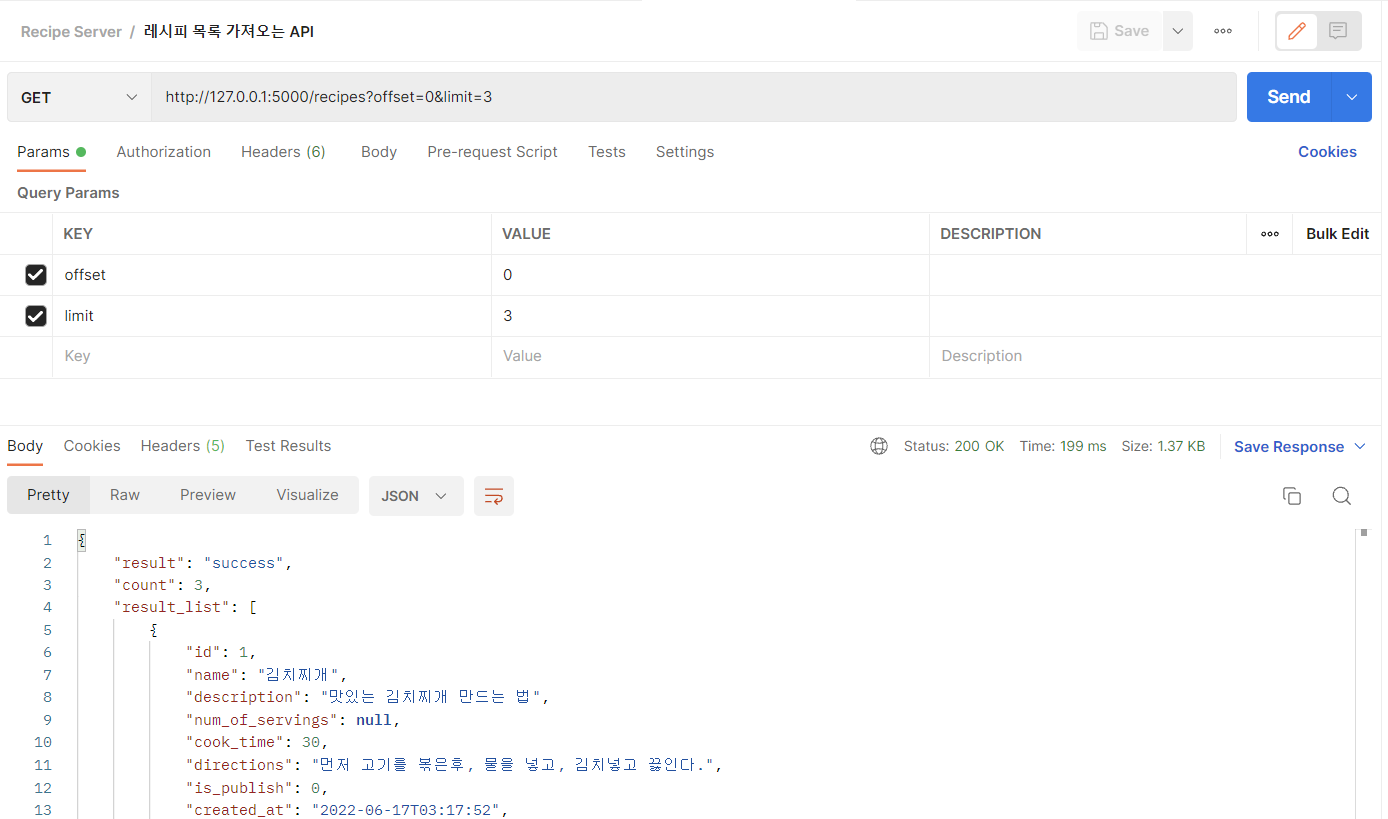
put 메소드를 사용하여 데이터를 업데이트하는 API를 만들자.
class RecipeResource(Resource):

    # 데이터를 업데이트하는 API는 PUT 함수를 사용한다.
    def put(self,recipe_id):

        # body에서 전달된 데이터를 처리
        data = request.get_json()

        # DB 업데이트 실행코드
        try :
            # 데이터 update
            # 1. DB에 연결
            connection = get_connection()

            # 2. 쿼리문 만들기
            query = '''update recipe
                        set name = %s, description = %s, cook_time= %s, directions= %s
                        where id = %s;'''

            record = (data['name'], data['description'], data['cook_time'],
            			data['directions'], recipe_id ) # 튜플형식


            # 3. 커서를 가져온다.
            cursor = connection.cursor()

            # 4. 쿼리문을 커서를 이용해서 실행한다.
            cursor.execute(query, record )

            # 5. 커넥션을 커밋해줘야 한다 => 디비에 영구적으로 반영하라는 뜻
            connection.commit()

            # 6. 자원 해제
            cursor.close()
            connection.close()

        except mysql.connector.Error as e :
            print(e)
            cursor.close()
            connection.close()
            return {'error':str(e)}, 503


        return {'result':'success'},200
# 경로에 레시피 아이디를 추가하기 때문에 새로운 클래스를 사용한다. (클라이언트로부터 /recipe/3와 같이 경로처리)
# 숫자가 바뀌므로 변수로 처리한다.
포스트맨으로 테스트한다.
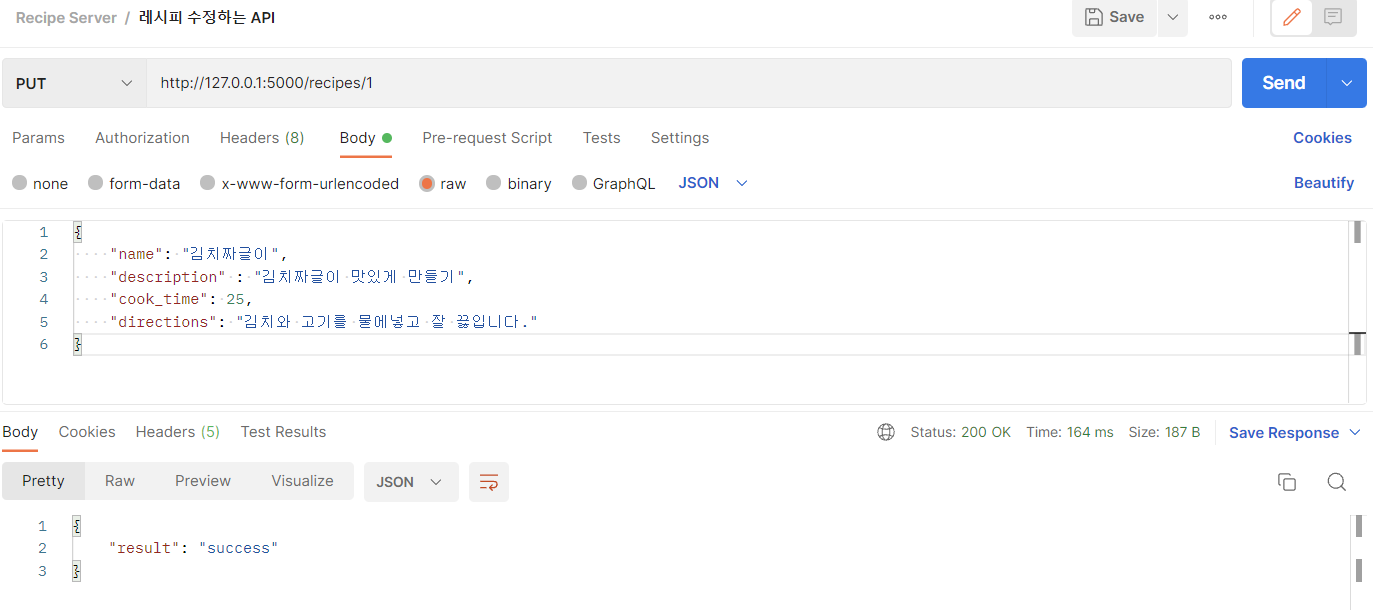

delete메소드로 레시피 삭제하는 API를 만들자.
    # 삭제하는 delete함수
    def delete(self,recipe_id ):
        try :
            # 1. DB에 연결
            connection = get_connection()

            # 2. 쿼리문 만들기
            query = '''delete from recipe
                        where id = %s;'''

            record = ( recipe_id, ) # 튜플형식


            # 3. 커서를 가져온다.
            cursor = connection.cursor()

            # 4. 쿼리문을 커서를 이용해서 실행한다.
            cursor.execute(query, record )

            # 5. 커넥션을 커밋해줘야 한다 => 디비에 영구적으로 반영하라는 뜻
            connection.commit()

            # 6. 자원 해제
            cursor.close()
            connection.close()

        except mysql.connector.Error as e :
            print(e)
            cursor.close()
            connection.close()
            return {'error':str(e)}, 503

        return {'result': 'success'} , 200
다 만들었으면 포스트맨으로 확인한다.
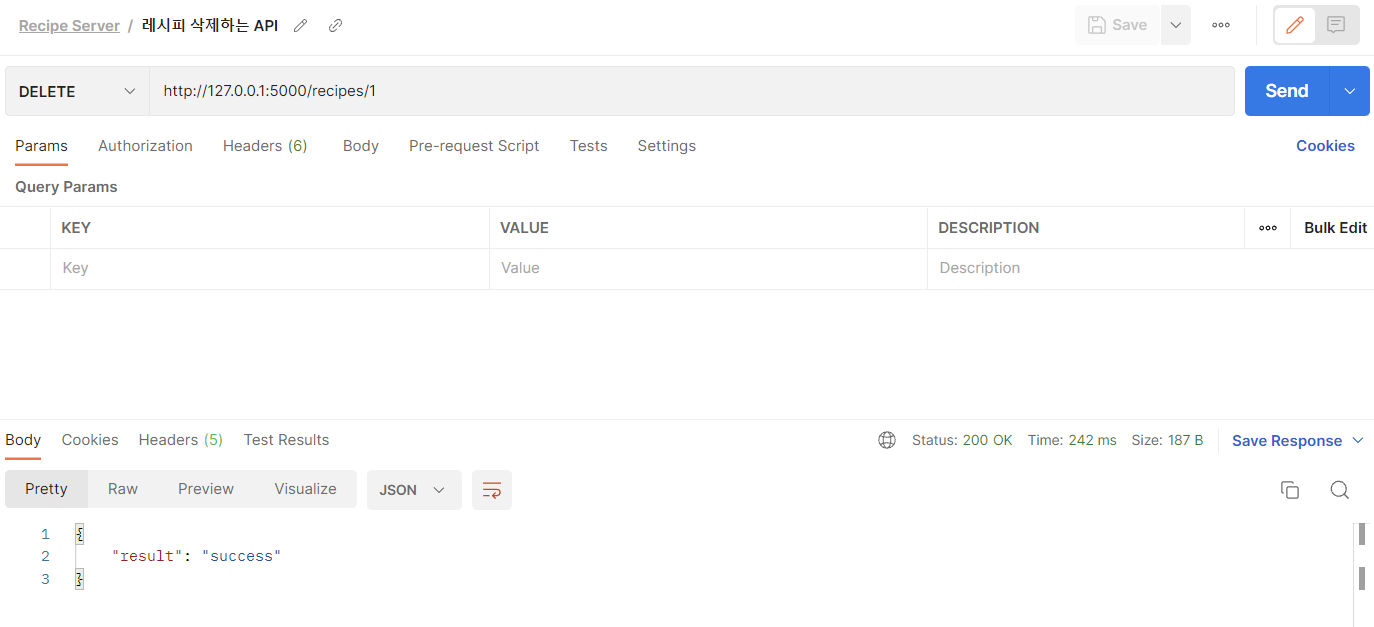

레시피 공개하는 테이블과 임시저장하는 테이블
from flask_restful import Resource
from mysql_connection import get_connection
import mysql.connector

class RecipePublishResource(Resource) :
    # 레시피를 공개한다.
    def put(self, recipe_id) :

        # 해당 레시피 아이디를 가지고
        # 데이터베이스에서 publish 컬럼을
        # 1로 바꿔준다.
        try :
            # 데이터 Update
            # 1. DB에 연결
            connection = get_connection()

            # 2. 쿼리문 만들기
            query = '''Update recipe
                    set is_publish = 1
                    where id = %s;'''

            record = (recipe_id, )

            # 3. 커서를 가져온다.
            cursor = connection.cursor()

            # 4. 쿼리문을 커서를 이용해서 실행한다.
            cursor.execute(query, record)

            # 5. 커넥션을 커밋해줘야 한다 => 디비에 영구적으로 반영하라는 뜻
            connection.commit()


            # 6. 자원 해제
            cursor.close()
            connection.close()
        except mysql.connector.Error as e :
            print(e)
            cursor.close()
            connection.close()
            return {"error" : str(e)}, 503

        return {'result' : 'success'}, 200


    # 레시피를 임시저장
    def delete(self,recipe_id):
        try :
            # 데이터 Update
            # 1. DB에 연결
            connection = get_connection()

            # 2. 쿼리문 만들기
            query = '''Update recipe
                    set is_publish = 0
                    where id = %s;'''

            record = (recipe_id, )

            # 3. 커서를 가져온다.
            cursor = connection.cursor()

            # 4. 쿼리문을 커서를 이용해서 실행한다.
            cursor.execute(query, record)

            # 5. 커넥션을 커밋해줘야 한다 => 디비에 영구적으로 반영하라는 뜻
            connection.commit()


            # 6. 자원 해제
            cursor.close()
            connection.close()
        except mysql.connector.Error as e :
            print(e)
            cursor.close()
            connection.close()
            return {"error" : str(e)}, 503

        return {'result' : 'success'}, 200
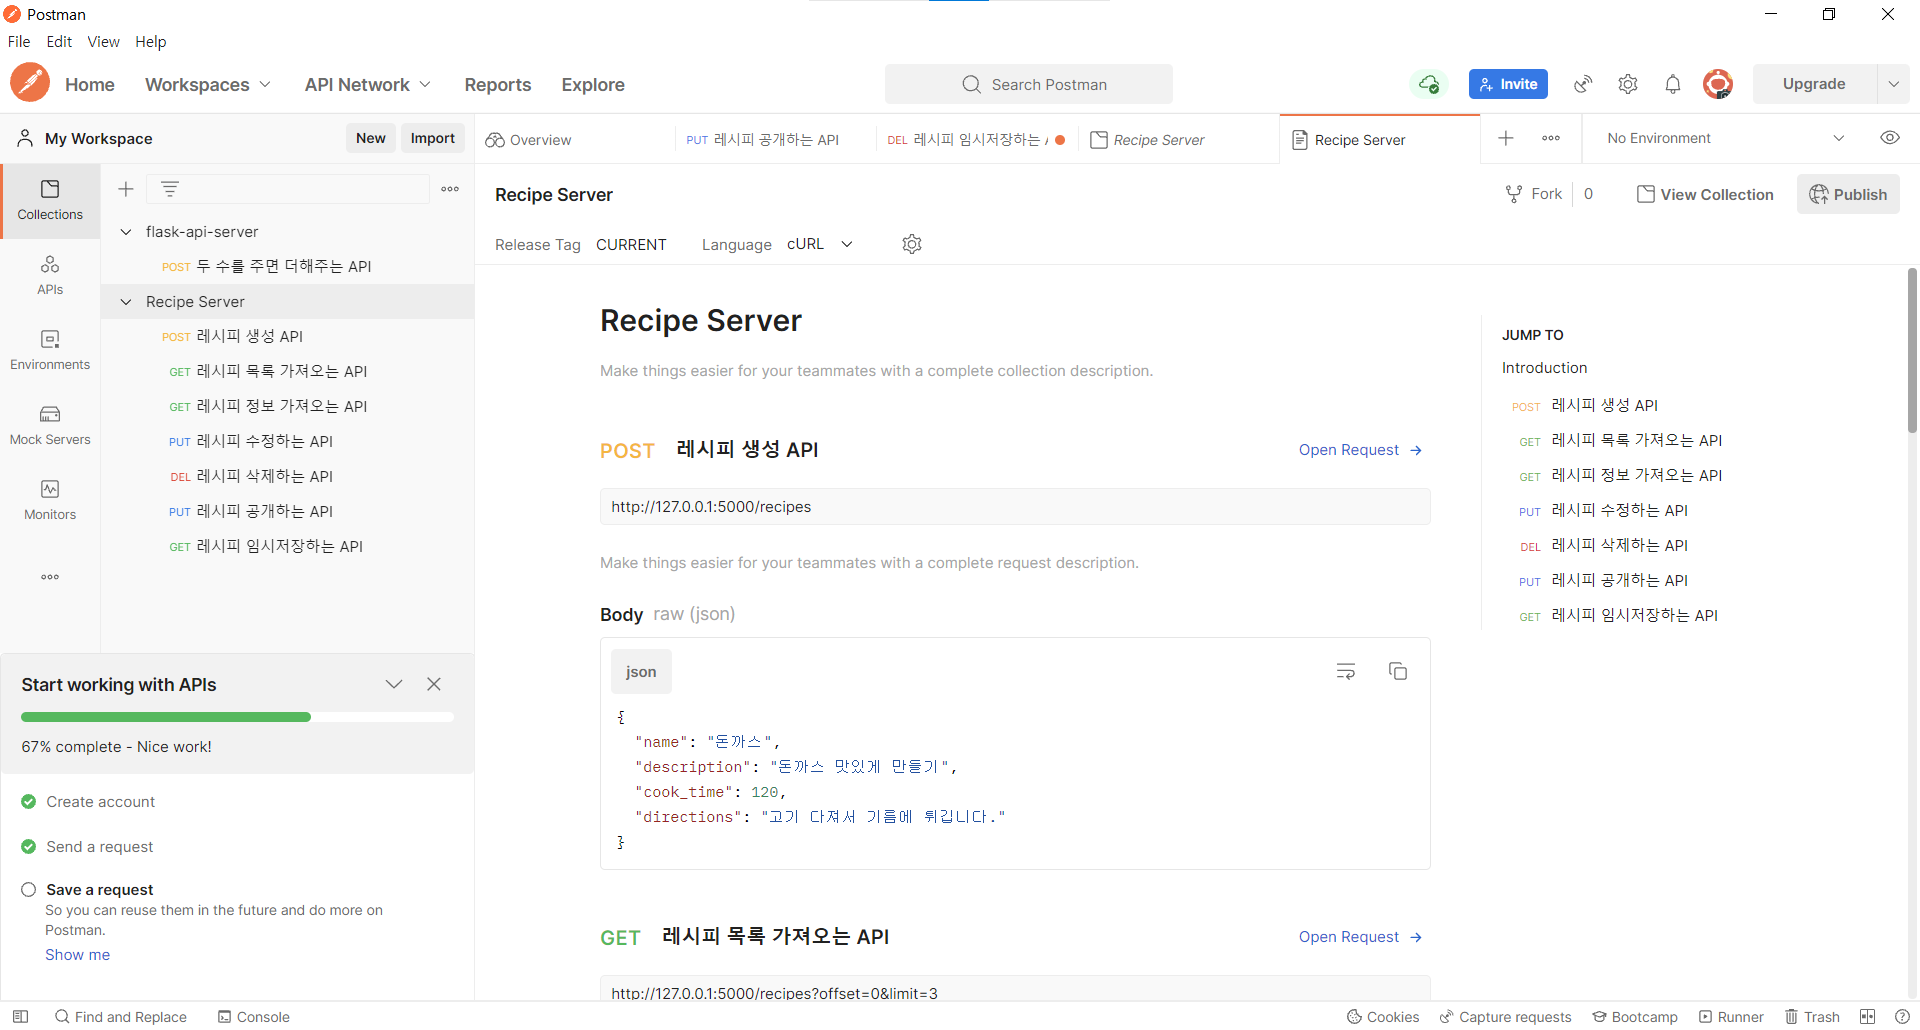
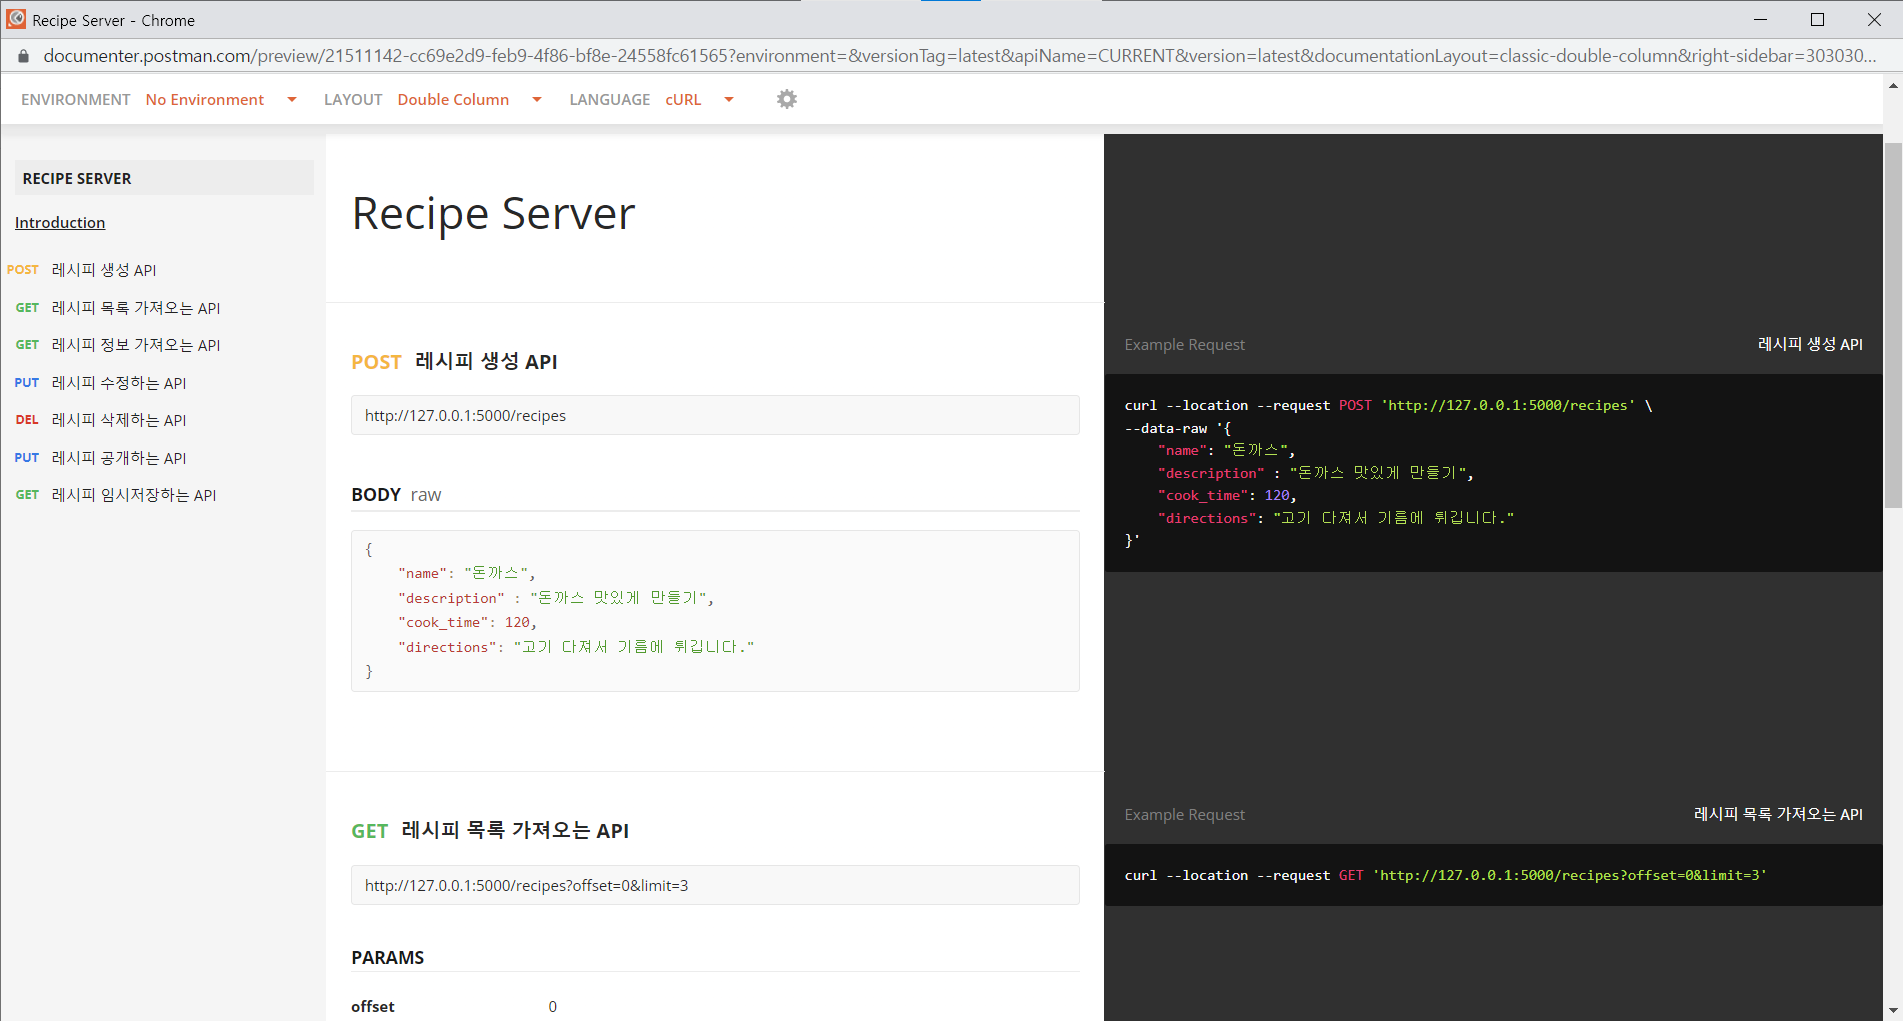
다 만든 API들을 포스트맨에서 프리뷰로 확인할수있다.
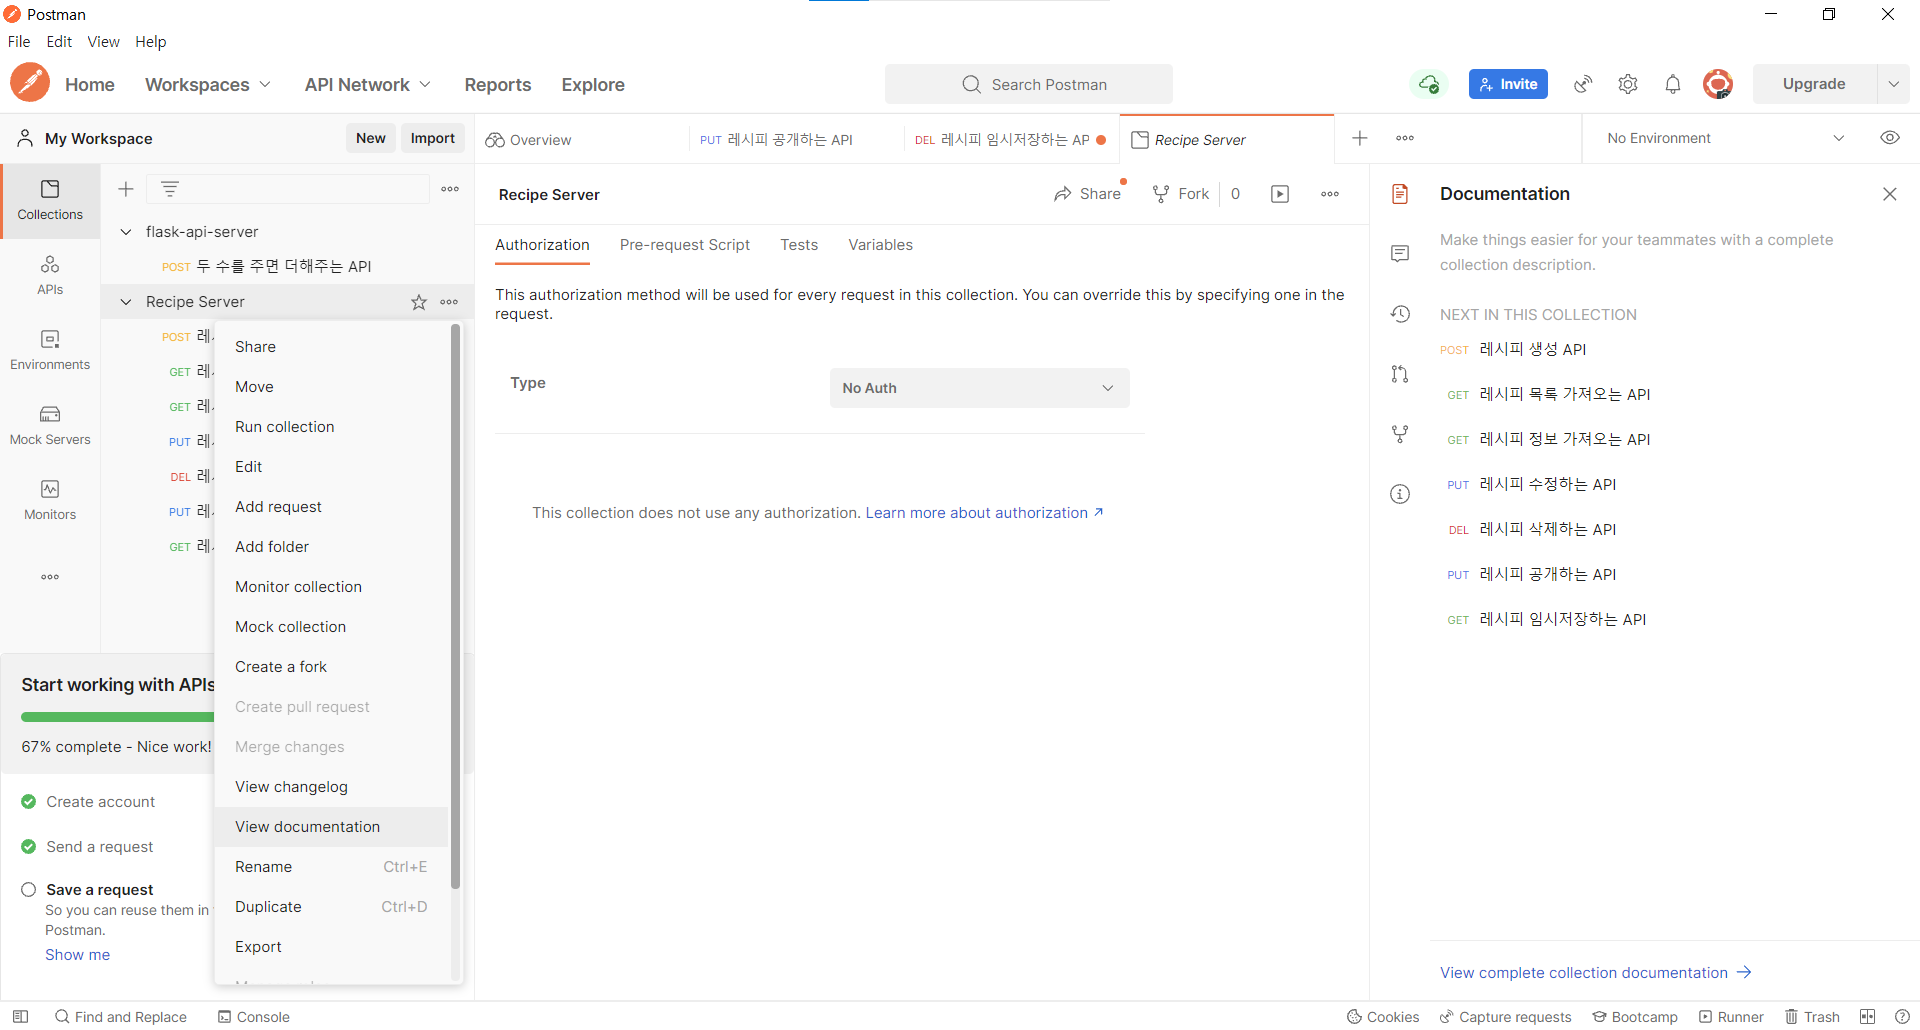
# 해당 프로젝트를 선택하여 메뉴버튼'···'을 누른 뒤 View documentation을 클릭한다.
오른쪽 상단의 Publish버튼을 누른다.
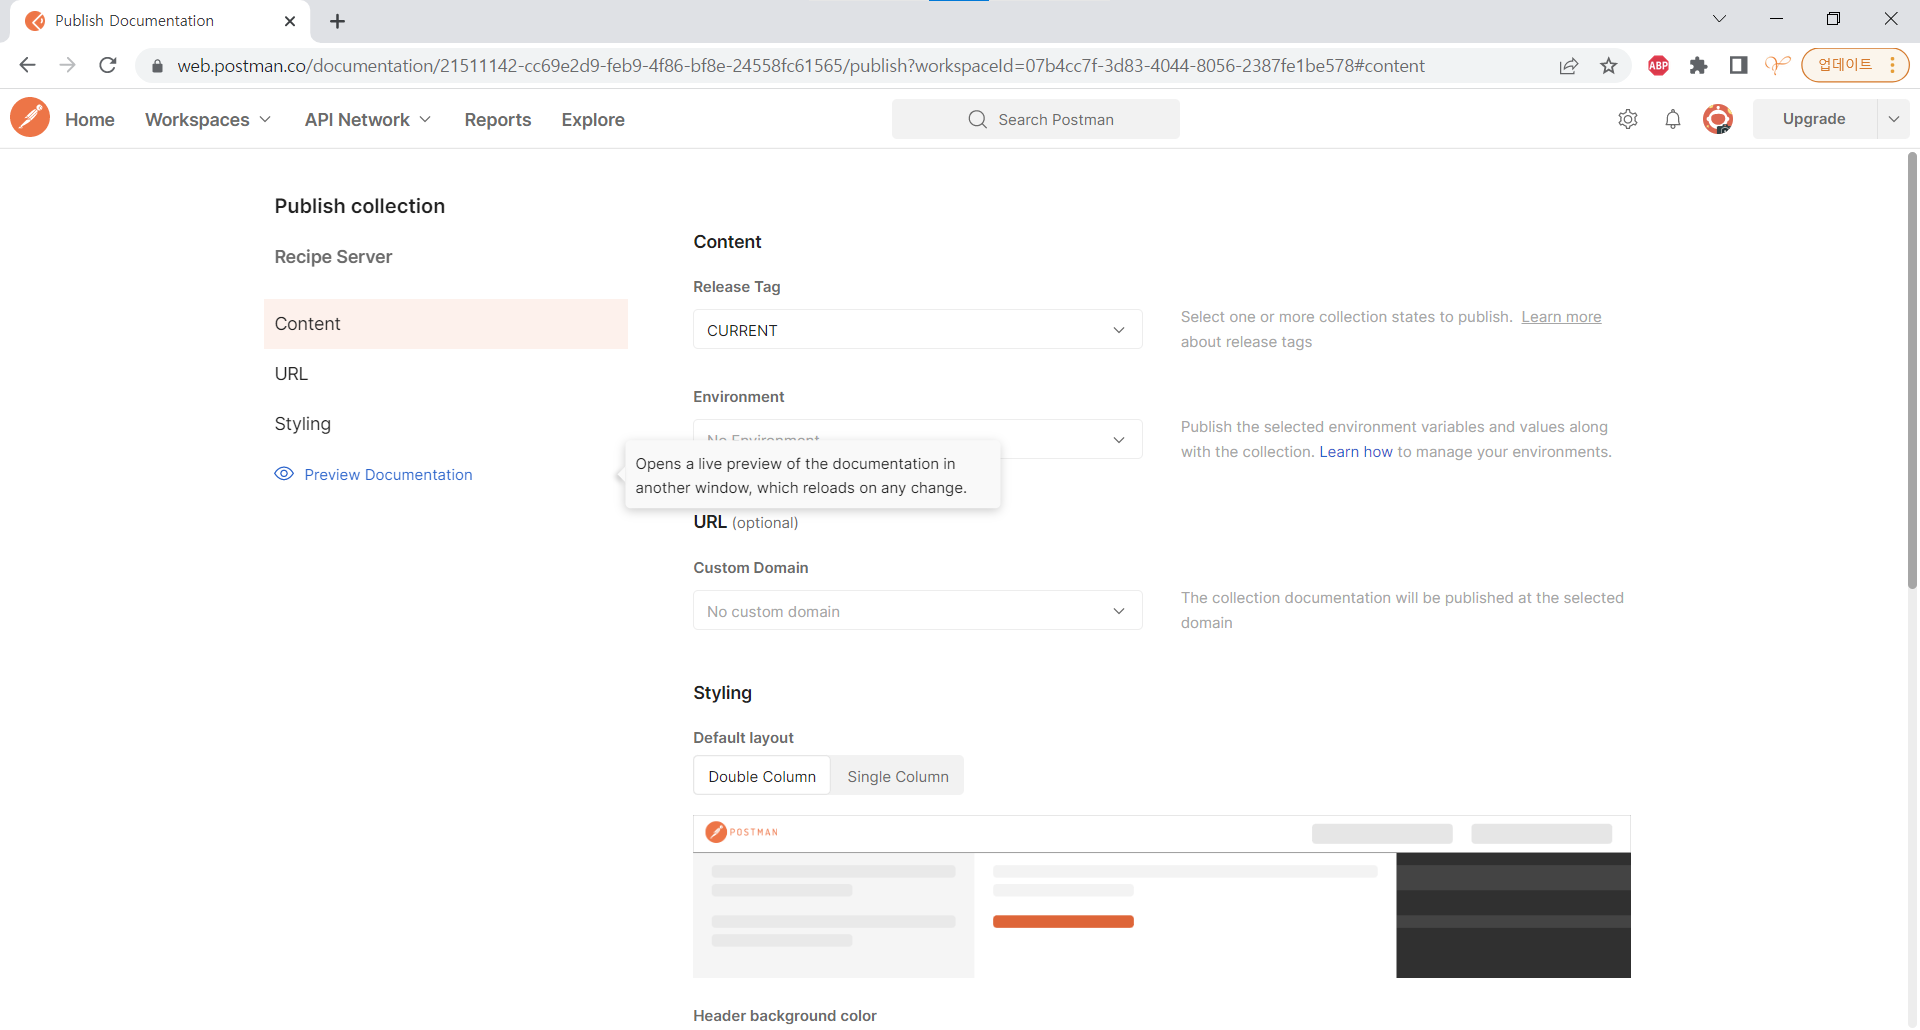
왼쪽의 Preview Documentation을 누른다.
그럼 이때까지 만든 API들을 하나의 창으로 깔끔하게 확인할수있다.
'백엔드 > API' 카테고리의 다른 글
| [API] AWS IAM 사용자 설정 (0) | 2022.06.23 |
|---|---|
| [API] 인증토큰 JWT, 로그인과 로그아웃: JWTManager, create_access_token, token_in_blocklist_loader (0) | 2022.06.20 |
| [API] 로그인 API: check_password (0) | 2022.06.20 |
| [API] 유저정보 저장: 비밀번호 암호화, 이메일 형식 확인, 예외처리 (0) | 2022.06.20 |
| [API] API(Application Programming Interface)와 postman (0) | 2022.06.17 |


댓글