[머신러닝] 스팸 분류 실습: CountVectorizer, Data Cleaning, Pipelining, NaiveBayes, Wordcloud
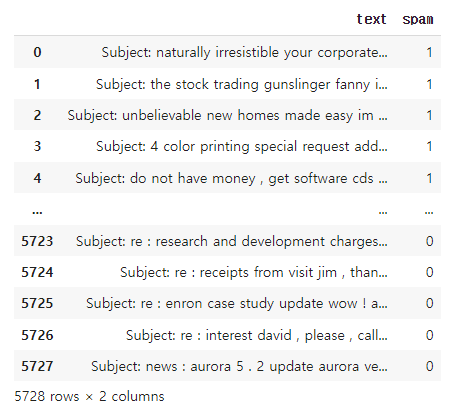
제시되는 데이터에는 약 5,728개의 이메일 메시지가 있으며, 스팸인지 아닌지의 정보를 가지고 있다.
spam 컬럼의 값이 1이면 스팸이고, 0이면 스팸이 아니다.
스팸인지 아닌지 분류하는 인공지능을 만들자 (Supervised learning의 분류 문제)
# colab으로 실습을 진행하였다.
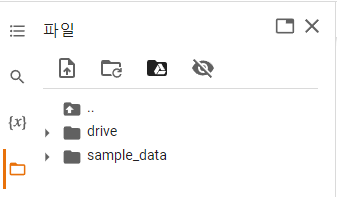
실습 1. 구글드라이브에 있는 emails.csv 읽기
from google.colab import drive
drive.mount('/content/drive')
# colab의 구글드라이브 마운트 버튼을 누르면 해당 코드가 나온다.
chdir로 디렉토리를 바꾸고 read_csv로 데이터를 불러오자.
in:
import os
os.chdir('/content/drive/MyDrive/Colab Notebooks/data')
df = pd.read_csv('emails.csv')
df
out:
실습 2. 스팸이 아닌것은 ham 변수로, 스팸인것은 spam 변수로 저장하시오.
ham = df.loc[df['spam'] == 0,]
spam = df.loc[df['spam'] == 1,]
실습 3. 쉼표, 마침표 등의 구두점 제거하기
구두점을 제거하는 함수는 string 라이브러리의 punctuation 함수를 사용하면 된다.
punctuation 함수를 확인해보자.
in:
import string
string.punctuation
out:
'!"#$%&\'()*+,-./:;<=>?@[\\]^_`{|}~'
테스트 문구로 구두점을 제거해보자.
in:
Test = 'Hello Mr. Future, I am so happy to be learning AI now~'

Test_punc_removed = []
for char in Test :
  if char not in string.punctuation :
      Test_punc_removed.append( char )
Test_punc_removed
out:
['H',
 'e',
 'l',
 'l',
 'o',
 ' ',
 'M',
 'r',
...
# 먼저 구두점을 제거한 단어들을 넣을 리스트를 먼저 만들고
# punctuation에 포함되지 않는 글자들을 리스트에 append한다.
# 단어로 나뉘지 않고 글자별로 나열되어 있다.
위의 리스트에 있는 문자들을, 하나의 문자열로 만들자.
in:
Test_punc_removed_join =  ''.join(Test_punc_removed)
Test_punc_removed_join
out:
'Hello Mr Future I am so happy to be learning AI now'
실습 4. STOPWORDS(불용어) 제거하기
nltk(Natural Language Toolkit) 라이브러리에서 stopwords(불용어)를 제공한다.
임포트하고 함수를 활용하여 변수로 지정하자.
in:
import nltk
nltk.download('stopwords')'

from nltk.corpus import stopwords
my_stopwords = stopwords.words('english')
my_stopwords
out:
['i',
 'me',
 'my',
 'myself',
 'we',
 'our',
 'ours',
 'ourselves',
 'you',
 ...
# nltk의 download함수 파라미터로 stopwords를 다운로드 한다.
# nltk.corpus의 stopwords를 임포트하여 stopwords.words함수 파라미터로 영어를 설정한다.
앞서 구두점을 제거한 문장에서 불용어까지 제거하자.
in:
Test_punc_removed_join_clean = []

for word in Test_punc_removed_join.split() :
  if word.lower() not in my_stopwords :
    Test_punc_removed_join_clean.append( word )
Test_punc_removed_join_clean
out:
['Hello', 'Mr', 'Future', 'happy', 'learning', 'AI']# 문장을 다시 단어로 나누고 소문자로 만든 후, 불용어를 제외한 단어들만 append했다.
실습 5. COUNT VECTORIZER 활용
카운트 벡터라이징(count vectorizing)으로 언어를 처리할수있다.
알파벳순으로 사용된 단어를 정리하고 해당 위치에 쓰이면 숫자로 카운트한다.
# 방식은 인코딩과 비슷해보이지만,
# 전체글에서 쓰인 단어들을 모두 열로 불러와 행에서 단어가 쓰이면 숫자를 매기는 방식이다.
먼저 CountVectorizer를 임포트하고 변수로 설정해준다.
from sklearn.feature_extraction.text import CountVectorizer
vec = CountVectorizer()
sample_data에 CountVectorizer를 사용하자.
sample_data = [ 'This is the first document',
                'I loved them',
               'This document is the second document' ,
               'I am loving you',
'And this is the third one']X = vec.fit_transform(sample_data)
X = X.toarray()
Xout:
array([[0, 0, 1, 1, 1, 0, 0, 0, 0, 1, 0, 0, 1, 0],
       [0, 0, 0, 0, 0, 1, 0, 0, 0, 0, 1, 0, 0, 0],
       [0, 0, 2, 0, 1, 0, 0, 0, 1, 1, 0, 0, 1, 0],
       [1, 0, 0, 0, 0, 0, 1, 0, 0, 0, 0, 0, 0, 1],
       [0, 1, 0, 0, 1, 0, 0, 1, 0, 1, 0, 1, 1, 0]])
vec.get_feature_names_out()array(['am', 'and', 'document', 'first', 'is', 'loved', 'loving', 'one',
'second', 'the', 'them', 'third', 'this', 'you'], dtype=object)이렇게 두가지 이상의 작업을 하나의 함수로 묶어서 처리하는것을 파이프라이닝(Pipelining) 한다고 한다.
import string
import nltk
nltk.download('stopwords')
from nltk.corpus import stopwords
my_stopwords = stopwords.words('english')

def message_cleaning(sentence) :
  # 1. 구두점 제거
  Test_punc_removed = [char for char in sentence if char not in string.punctuation ]
  # 2. 글자들을 조인
  Test_punc_removed_join = ''.join(Test_punc_removed)
  # 3. 불용어 제거
  Test_punc_removed_join_clean = [word for word in Test_punc_removed_join.split() if word.lower() not in my_stopwords ]
  # 4. 필요한 단어들만 리턴
return Test_punc_removed_join_cleanvec = CountVectorizer(analyzer= message_cleaning)X = vec.fit_transform( df['text'] )
X<5728x37229 sparse matrix of type '<class 'numpy.int64'>'
with 565908 stored elements in Compressed Sparse Row format>X = X.toarray()
Xarray([[0, 0, 0, ..., 0, 0, 0],
[0, 0, 0, ..., 0, 0, 0],
[0, 0, 0, ..., 0, 0, 0],
...,
[0, 0, 0, ..., 0, 0, 0],
[0, 0, 0, ..., 0, 0, 0],
[0, 0, 0, ..., 0, 0, 0]])y = df['spam']
실습 8. 데이터셋으로 인공지능을 학습시켜라
먼저 학습용과 테스트용 분리한다.
from sklearn.model_selection import train_test_split
X_train, X_test, y_train, y_test = train_test_split(X, y, test_size=0.2, random_state = 15)

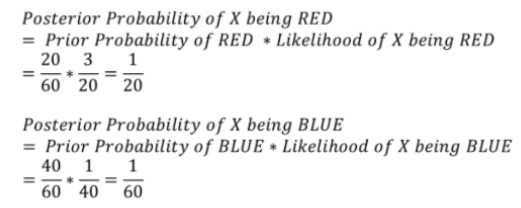
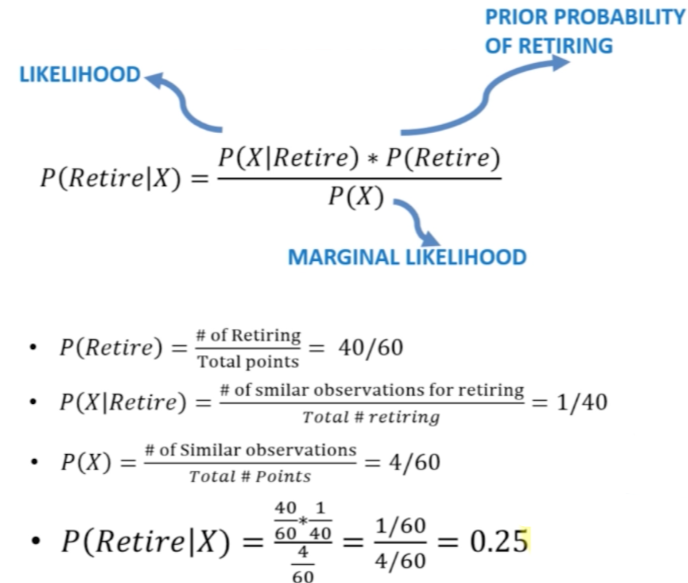
# 데이터 전체를 대상으로 계산한 사전 확률(Prior Probability)과 새로운 데이터에 인접한 데이터를 해당 그룹의 전체 수로 나눠 계산한 Likelihood를 활용한다.
from sklearn.naive_bayes import MultinomialNB, GaussianNB

# 학습
classifier1 = MultinomialNB()
classifier1.fit(X_train, y_train)

classifier2 = GaussianNB()
classifier2.fit(X_train, y_train)

# 테스트
from sklearn.metrics import accuracy_score
y_pred1 = classifier1.predict(X_test)
y_pred2 = classifier2.predict(X_test)

# 정확도
print(accuracy_score(y_test, y_pred1))
print(accuracy_score(y_test, y_pred2))
out:
0.9860383944153578
0.9546247818499127
# 지금 데이터셋에서는 MultinomialNB 방식이 더 정확도가 높다고 나온다.
실습 9. 다음 2개의 문장을 테스트 해보시오.
testing_sample1 = ['Free money!!!', "Hi Kim, Please let me know if you need any further information. Thanks"]

testing_sample2 = ['Hello, I am Ryan, I would like to book a hotel in Bali by January 24th', 'money viagara!!!!!']
첫번째 문장:
in:
new_data1 = np.array(testing_sample1)
X = vec.transform(new_data1)
X = X.toarray()
classifier1.predict(X)
out:
array([1, 0])# 같은 이메일을 변환시켰던과 같은 카운트 벡터라이징의 변수인 vec를 사용해준다.
# 첫번째는 스팸메일, 두번째는 스팸메일이 아닌것으로 나타난다.
두번째 문장:
in:
new_data2 = np.array(testing_sample2)
X = vec.transform(new_data2)
X = X.toarray()
classifier1.predict(X)
out:
array([0, 1])# 첫번째는 스팸메일이 아니고, 두번째는 스팸메일 인것으로 나타난다.
실습 10. 스팸 이메일에는 어떤 단어들이 많이 들어있는지 WordCloud를 활용하여 Visualizing하시오.
워드 클라우드를 사용하려면,
먼저 판다스의 컬럼에 저장된 문자열을, 리스트로 먼저 받아오고
그 후, 리스트에 있는 문자열을 다 합쳐서 하나의 문자열로 만들어준다.
먼저 WordCloud와 STOPWORDS를 임포트한다.
from wordcloud import WordCloud, STOPWORDS
스팸 이메일의 내용을 리스트로 만들고 하나로 합친다.
spam_email_list = spam['text'].tolist()
spam_email = ''.join(spam_email_list)
my_stopwords = STOPWORDS
my_stopwords.add('us')
my_stopwords.add('subject')from PIL import Image# 임포트할때 대소문자에 유의하자.
이미지를 불러와 img 변수로 저장하고 넘파이 array로 변환해 다시 img_mask 변수로 저장한다
img = Image.open('images1.jpg')
img_mask = np.array(img)
이제 위의 가공된 이미지 데이터를 활용해 wordcloud를 만든다.
in:
wc = WordCloud(background_color='white', mask= img_mask, stopwords = my_stopwords)
wc.generate(spam_email)

plt.figure(figsize = (10, 6))
plt.imshow(wc)
plt.axis('off')
plt.show()
out:
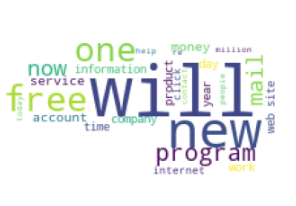
# wordcloud 함수의 mask 파라미터에 준비된 이미지 파일을 넣어 그 이미지의 형태로 wordcloud의 틀을 잡는다.
# stopwords 파라미터에 추가된 불용어가 포함된 변수를 집어넣는다.
# generate함수에 앞서 만들어뒀던 spam_email를 입력해 wordcloud에 쓰일 단어들을 설정한다.